Transforming objects

Objects can be flipped, rotated, positioned and sized on the page or with absolute precision using the Transform panel.

Transform before
Transform after
Sizing an object.

About the transform origin

You can also transform an object about a point on its own geometry, another object's geometry or a point on the page.

Transforming
The text object is rotated about its repositioned transform origin using the Move Tool.

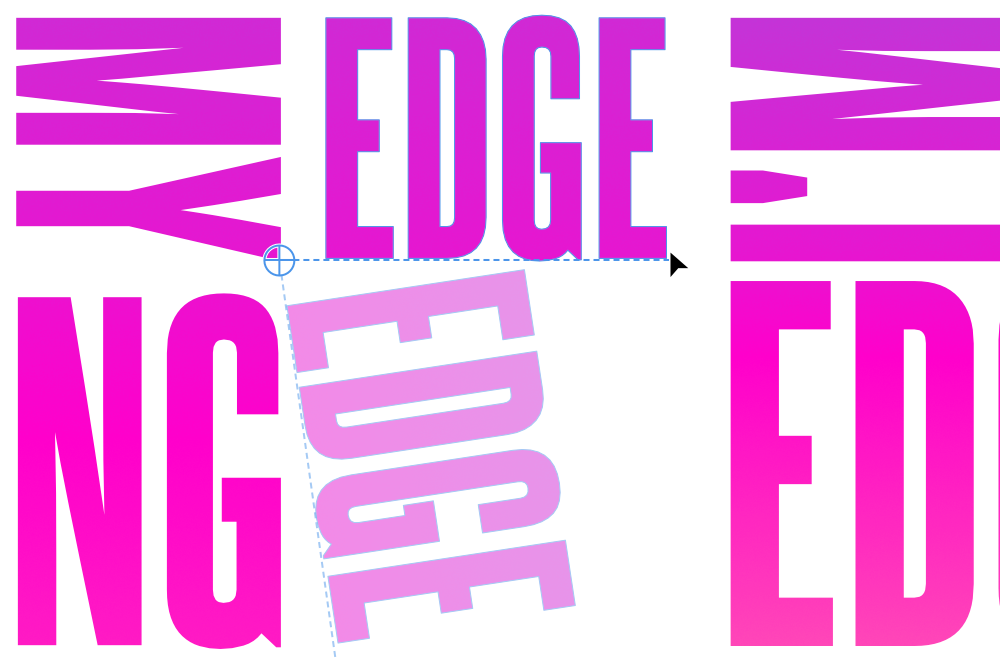
A transform origin is a position around which rotation, scale and resize transforms are performed on an object or a group.

It is commonly the centre point, a corner, or an edge centre of the selection's bounding box. It can also be an arbitrary position inside or outside of the selection.

A selected object or group's rotation handle transforms the selection around its centre point by default.

The Transform panel's Anchor setting provides nine common transform origins on a selected object for use with its Rotation, Shear, Width and Height settings.

On the Move Tool's context toolbar, Enable Transform Origin (in Move Options) allows arbitrary placement of a transform origin, which works with a selection's rotation handle and relevant settings on the Transform panel.

Rotate Clockwise Rotate Anticlockwise Flip Horizontal Flip Vertical To flip or rotate objects:
  1. Select one or more objects.
  2. On the Transform panel, tap a flip or rotate option.
To position objects accurately:
  1. Select one or more objects.
  2. On the Transform panel, change X and/or Y values.
To size objects accurately:
  1. Select one or more objects.
  2. On the Transform panel, change Width and/or Height values.
To size objects to same:
  1. Select multiple objects, ensuring the object to be sized to is selected first. To do this, use -tap to target it first or a marquee selection that encompasses it first.
  2. Transform panel Match Width Match Height On the Transform panel, tap Alignment Options, then set a Make Same option, choosing to size to Width or Height.
  3. (Optional) Enable Maintain Aspect Ratio to ensure the objects will resize using their original proportions.
To size objects to a targeted key object:
  1. Select multiple objects.
  2. With the modifier pressed on the hardware keyboard or Command Controller, tap the target object. The selected key object will possess a strong outline.
  3. Transform panel Match Width Match Height On the Transform panel, tap Alignment Options, then set a Make Same option, choosing to size to Width or Height.
To nudge objects (hardware keyboard only):
  1. Select one or more objects.
  2. (Optional) Hold the .
  3. Press an arrow key to adjust the selection's position by the predefined nudge distance.
Move Tool Enable Transform Origin To transform a selected object about a specific point:
  1. On the Move Tool's context toolbar, tap Move Options, then select Enable Transform Origin.
  2. Drag the transform origin to your chosen 'pivot' point on the current or another object's path (or specific node), or even an arbitrary point on the page.
  3. (Optional) Reposition the object so its transform origin snaps to another object's geometry or node.
  4. Transform the object using its rotation handle or Transform panel settings that respect the transform origin (Width, Height, Rotation and Shear).
Transform Separately To transform selected objects separately:
  1. Select multiple objects.
  2. On the Move Tool's context toolbar, tap Move Options, then tap Transform Separately.
  3. Transform the object that has control handles around it. Bounding boxes around the others indicate the transform will be applied to each individually.

Scale override

When an object is resized, the stroke width, layer effect radii, corner radii and text frame contents can be forced to scale by using the Transform panel. If Scale with object settings are disabled on the object itself (stroke, layer effect, etc.) then they will be ignored.

Scale Override To override scaling on objects:
  1. Select an object.
  2. On the Transform panel, enable Scale Override.
  3. Resize via the object's handles while maintaining its aspect ratio.
Scale Override To override scaling on objects selectively:
  1. Select an object.
  2. On the Transform panel, tap the Scale Override down arrow and then Show Scale Override Options.
  3. Enable/disable the following settings:
    • Line weights—useful when working on vector objects with a stroke. For example, you can either force or prevent scaling whilst resizing with the setting set to Scale with object or Locked, respectively.
    • Shape corners—to control the scaling of a shape's corners while resizing, you can either force (Scale with object) or prevent (Locked setting).
    • Layer effect radii—to control the scaling of the radius of a layer effect added to an object.
    • Text frame contents—to control the scaling of frame text while resizing; when set to Locked the container will scale whilst keeping text the same size. When set to Scale with object however, text will enlarge when resizing the container by its corner handles.
  4. Ensure the Scale Override button is enabled.
  5. Resize via the object's handles while maintaining its aspect ratio.

SEE ALSO: