A layer mask is used to reveal or hide a portion of a layer. Layer masks are commonly used with adjustments, filters and creative effects to selectively reveal or hide them on parts of a photo rather than globally. Using masking is non-destructive, which means you can return to refine your adjustments at any given time.
In Affinity Photo 2, two types of masking is possible:
Pixel masking: performs a similar task to the erase tools with one important difference; a pixel mask can be modified, or even discarded.
Vector masking: this involves using vector content as a mask over another layer that crops to the vector content's outline.
Pixel Selection Mask
Greyscale Painted Mask
Transparency Mask
Clipping Mask
Colour Selection Mask
Luminosity Mask
Channel Mask
Vector Mask
About masks
Masks are applied as separate layers, allowing them to be freely edited and moved. Mask layers affect any layer below them in the Layers panel, unless clipped to individual layers.
You can apply destructive filters to mask layers. For example, a selection of blur, sharpen, distortion or noise filters can be applied to mask layers, as well as layers with mask layer properties such as adjustment layers, live filter layers and masked fill layers; spare channels can also take destructive filters too.
Layer masks allow for a non-destructive workflow. Any adjustments made on a mask can be returned to and modified without any loss in image quality.
Mask layers can have a unique blend mode assigned.
To create a mask layer:
On the Layers panel, select the layer you wish to mask.
Tap Add.
From the pop-up menu, select Mask Layer.
To create an empty mask layer:
On the Layers panel, select the layer you wish to mask.
Tap Add.
From the pop-up menu, select Empty Mask Layer.
Other mask types
Apart from the default mask and empty mask, Affinity Photo 2 introduces additional non-destructive masking options. These are available via Add and offer more control over the edit depending on the desired workflow and outcome.
The following additional mask types are available:
Compound Mask Layer—a powerful masking system that uses boolean operators to combine masks non-destructively.
Luminosity Live Mask Layer—a live, non-destructive mask that targets pixels based on their luminosity value.
Hue Live Mask Layer—a live, non-destructive mask that targets pixels based on hue.
Bandpass Live Mask Layer—a live, non-destructive mask that targets pixels based on a configurable frequency band, used in a range of sharpening techniques.
To create one of the above masks:
On the Layers panel, select a layer to target.
Tap Add.
Choose an option from the pop-up menu.
Masking methods
Masking can be performed using a number of methods depending on what you wish to target.
Pixel selection
Great when working with a range of photographic genres, where adjustments are targeted to a specific pixel area.
To create a mask based on pixel selection:
Make your selection
On the Layers panel, tap Add and then tap Mask Layer. The added mask will hide areas outside a selection (if a selection is in place) or display the entire layer (if no selection is in place).
(Optional) Refine mask selection and decide on its output.
Greyscale
Based on dark and light values, this type of masking can be used to control the amount of visibility of the added effect, adjustment, etc. Greyscale masks are great to work with images of high contrast as they give you a high-level of control over the adjustment's opacity.
To mask using greyscale:
Select a layer.
Add an effect or an adjustment.
Create a mask then do one of the following:
Use the Paint Brush Tool with its colour set at a tonal value of grey, 50%, say.
Use the Gradient Tool and set the start and end points' tonal values as required.
Transparency mask
Setting different levels of transparency to a layer mask controls how much of the effect is visible (see-through).
To control transparency:
Select a layer.
Add an effect or an adjustment.
Change the Opacity value on the Layers panel.
Clipping mask
Using a clipping mask, you may take one item and transform it into another. Common examples are an image enclosed in text or a drawn shape.
To create a clipping mask:
Open an image.
Create an object, e.g. text or a shape, and ensure it is selected.
Do one of the following:
Drag the object layer onto the thumbnail of the image layer you want to clip to.
On top of the Layers panel, tap Mask and Rasterise, then select Mask To Below.
The masking object is clipped to the target object using a "crop to top object" operation.
The masking object can be a group of objects which will remain as independent objects after masking; the group can be expanded/collapsed and its objects will remain editable.
Colour range selection mask
When there is no clear edge to your subject, such as in landscape photography, clouds fade into the background, you may wish to employ the colour range masking technique. Then, identifying the pixels based on their colour will prove far more precise.
To mask using sampled colour range:
Select the image layer.
From the Selection menu, tap Select Sampled Colour.
Tap on the area of the image to sample a colour value.
(Optional) Adjust context toolbar setting for the colour spectrum and Tolerance on the vertical slider. For the latter, when higher values are set, more of an area with similar colour information will be selected.
On the context toolbar, tap Apply.
Add an adjustment to target your colour-based selection.
Paint, erase or fill the adjustment layer as on any mask.
Luminosity mask
We can target specific tonal areas of an image based on Luminosity. The selected are the grey tonal values of an image, and not colour.
To create a luminosity mask:
On the Layers panel, choose the pixel (image) layer and tap Layer Options.
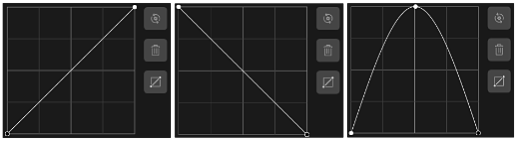
Under Master colour channels section, tap on the Source graph. The graph denotes the Source Layer Ranges.
Adjust, as required—dragging the left node all the way down will isolate highlights, and the right node (all the way down) will isolate the dark tones. To isolate midtones, a three-node shape is required (see image below for reference).
Navigate back to the Layers panel and add a mask.
From left: highlights, dark tones and midtones targeting, respectively.
Channel mask
This masking method is particularly useful for targeting midtones, shadows and highlights of an image based on colour channels' information, where you can separate and edit them non-destructively.
To create a channel mask:
Select the image layer.
On the context toolbar, tap the Selection menu, then choose Select Tonal Range and decide on either: Select Shadows, Select Midtones or Select Highlights.
On the Channels panel, on the Pixel Selection Alpha channel, tap the Options menu and select Create Spare Channel.
(Optional) Rename this depending on the selected tonal range.
Repeat the above for other tonal values, if required.
Vector mask
This is a path that cuts out the content of a layer. In general, it is more accurate than one formed with pixel based methods. A Vector mask is usually created with a Pen Tool or a Shape Tool.
To create a vector mask:
On the Layers panel, select a layer with vector content, e.g. a shape layer.
Place an image in the document.
Drag the vector layer and offer it to the thumbnail of the image layer.
Masking actions
Non-destructive by design, masks can be further edited, inverted, updated hidden or deleted completely at any time in the editing workflow.
To edit a pixel mask:
On the Layers panel, select the layer mask.
Do one of the following:
To erase from the mask, paint on the page using the Erase Brush Tool or the Paint Brush Tool set to black primary colour.
To restore the mask, paint on the canvas using the Paint Brush Toolset to white as its primary colour.
Select the Gradient Tool and drag across the layer. Adjust the gradient colours, as required.
To invert a pixel mask:
On the Layers panel, select the layer mask.
On the Channels panel, tap More, and then Invert.
To change pixel mask properties:
As you erase or paint on the mask, adjust the brush's properties from the sliders on the left (next to the tools).
To hide/show a pixel mask:
On the Layers panel, tap Toggle Visibility on the mask layer.
To add a pixel mask to vector content:
On the Layers panel, select a layer with vector content.
Paint on the page using the Erase Brush Tool.
By default, the Assistant will add a layer mask to the selected layer to accommodate your brush strokes. Once the mask is in place, you can 'restore' the mask using the Paint Brush Tool.