The Colour panel is used to choose colour for various brush tools and to apply colour to the stroke and fill of vector shapes, lines, and text.
About the Colour panel
The Colour panel can operate in several colour modes—RGB, RGB Hex, HSL, CMYK, LAB and Greyscale—and has various ways of presenting colour options—using sliders, a colour wheel (HSL only), or colour boxes. Colour tints can also be applied from within the panel.
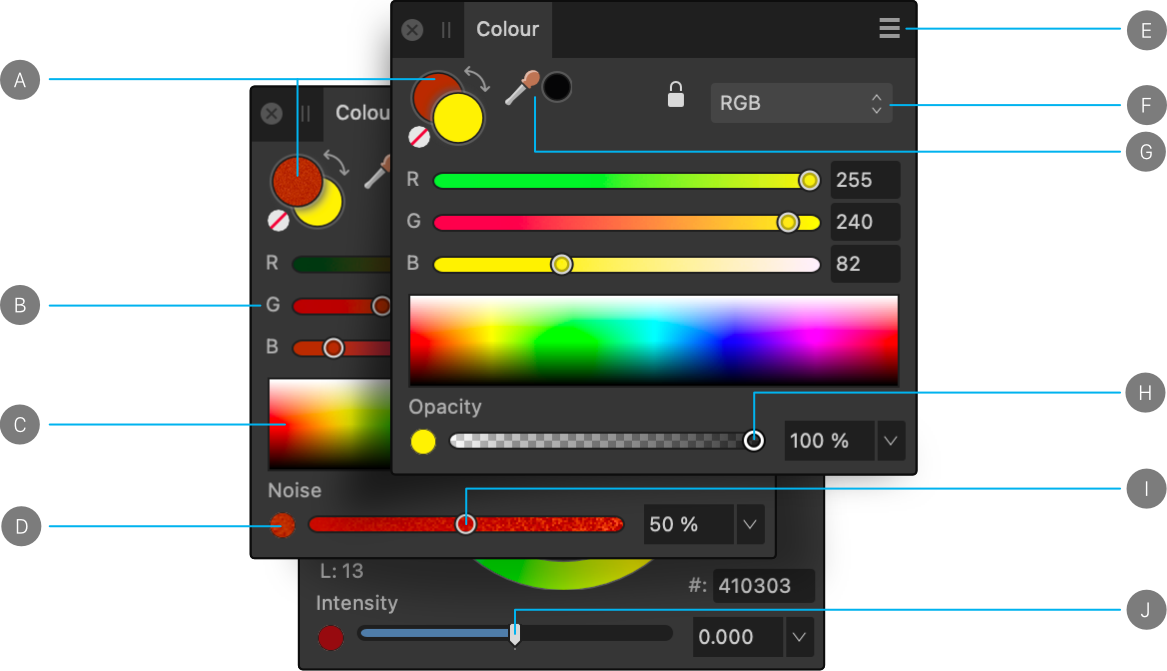
Colour panel (RGB sliders): (A) Set Foreground/Set Background colour selectors with colour 'none' swatch and 'swap' arrow, (B) RGB sliders, (C) RGB spectrum, (D) Opacity/Noise/Intensity toggle, (E) Panel Preferences, (F) Colour model selection, (G) Colour Picker and picked colour swatch, (H) Opacity control, (I) Noise control, (J) Intensity control (32 bit documents only).
The active colour selector is shown at the front of the two colour selectors. Choosing a new colour will apply it to the active colour selector.
For vector shapes, lines and text, the colour selector is for stroke and fill colour instead of Foreground and Background colour, respectively.
Using the Colour panel
With the Colour panel, colours can be set for use by a tool in just a few clicks. Opacity and noise are further colour attributes which can be applied via slider. Additionally, for 32-bit unbounded HDR documents, an intensity attribute is available as a slider for creating unbounded colour values.
To set the colour of a selector:
Click the selector you want to apply the colour to. It will show at the front of the two colour selectors.
Do one of the following:
Choose a colour from the colour model's Sliders, Wheel (HSL only), or Boxes.
Click the picked colour swatch.
Click the None swatch to make the colour completely transparent (for the tool, fill or stroke).
To switch colours between the selectors:
Click the double-headed arrow. The colours switch but the active swatch selector remains the same.
To adjust opacity, noise or intensity setting:
Select the Opacity/Noise/Intensity toggle button at the bottom-left of the panel.
Drag the slider to set the value.
Colour selection preferences and colour models
When choosing colours in the Colour panel, you can choose from various selection preferences and colour model values. The colour selection preferences are changed in the Panel Preferences menu.
Depending on the colour model selected, you can also choose to work in 8 bit, 16 bit or Percentage mode.
Some of the selection methods allow you to set colour using values other than RGB. This doesn't change the working colour profile of the document, but changes the input values for the colours.
The following colour selection preferences are available from the Panel Preferences menu.
Wheel—HSL Colour Wheel
Drag on the outer ring to set the hue, and drag in the triangle to set saturation and lightness.
Click a swatch to the right of the wheel to select a recently used colour.
Enter an RGB Hex value into the # setting.
Sliders—RGB, HSL, CMYK, LAB, Greyscale
Select the colour mode from the pop-up menu.
(Optional) From the Panel Preferences menu, select 8 bit, 16 bit or Percentage.
Drag sliders or type directly into the value boxes to set the colour values.
Boxes—Hue, Saturation, Lightness only
Hue—Drag on the hue slider to set the hue, drag in the box to set the saturation and lightness.
Saturation—Drag on the saturation slider to set the saturation, drag in the box to set the hue and lightness.
Lightness—Drag on the lightness slider to set the lightness, drag in the box to set the saturation and hue.
Tint
Drag the slider to the left or right to increase or decrease the colour tint, respectively.
The HSL colour wheel's Saturation/Lightness control can be changed from Triangle to Square via the Panel Preferences menu.
For any selected object, the Colour panel will remember the colour mode that the object was created in. Instead, using Sliders you can lock the colour mode (e.g., CMYK sliders) to prevent the mode from changing. This avoids inadvertently swapping to another mode after using swatches or selecting a different object created with a different colour mode. This lock only works on the current session; subsequent sessions will use the HSL colour wheel as default.
Using the Colour Picker
The picker lets you sample colours within or outside Affinity Photo 2, then use them in your design.
To use the Colour Picker:
(Optional) Select an object to adopt the picked colour on picking.
Click the selector you want to apply the colour to.
Drag the Colour Picker to the colour you want to sample.
Saving chosen colours for later use
Once your colour has been chosen and applied to a tool or content, there are several ways to preserve this colour for later use.
The following options are available from the Panel Preferences menu.
Copy Colour to Clipboard as Hex—this calculates the current colour's Hex value and adds it to the clipboard. This is useful for web developers, to standardise on colours between graphics and HTML coding in a web environment.
Add Colour to Swatch—adds the current colour to the currently loaded palette in the Swatches panel.
Add Chord to Swatch pop-up menu—adds a chord of the current colour to the currently loaded palette in the Swatches panel.