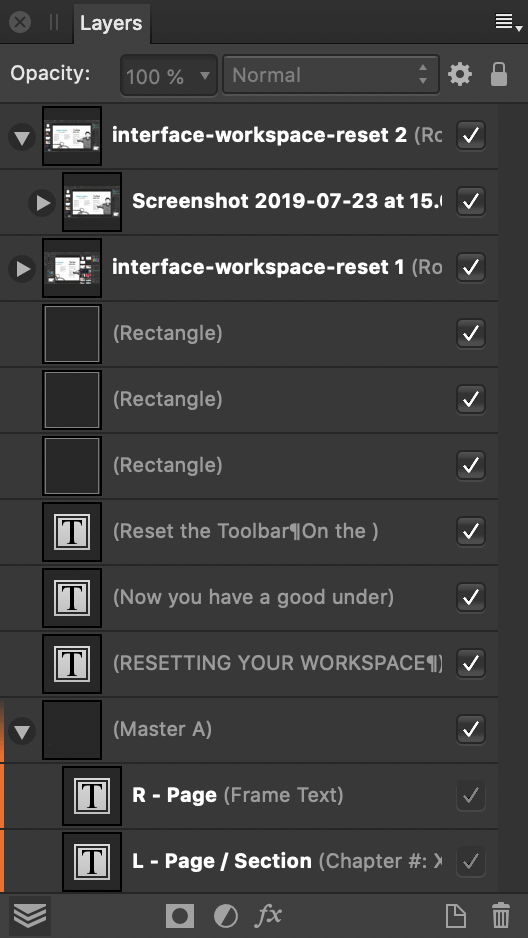
About the Layers panel
Layers are composited together to form your complete design which shows up on your page.
The panel can be used to build up your design as multiple layers, with each layer devoted to a particular facet (e.g., lines, shapes, text, adjustments, etc.).
From the Layers panel you can:
- Create or delete layers
- Select layers, groups and objects
- Arrange and reorder layers
- Show and hide layers, groups and objects
- Lock layers, groups and objects
- Clip objects or layers
- Apply layer opacity
- Apply blend modes and blend ranges to layers
- Create masks
- Add layer adjustments and effects
- Tag layers with a choice of colours
- Change the UI display colour of all object's path, nodes and handles
- Create export slices
- Exclude object from being a snapping candidate (-click object only)
- Switch off Auto-scroll (panel scrolls to layer content when it is selected on the page)
- Move master layer contents to the top of the layer stack to present master page items above other objects in your publication.
- Display layer thumbnails with a solid or checkerboard background
- Determine the size of layer thumbnails

The panel displays the following:
 Panel Preferences menu which offers:
- Auto-Scroll—when selected (default), the selected object's layer entry immediately comes into view in the Layers panel.
- Checkerboard Background—when selected, layer thumbnails will display with a checkerboard background.
- Show Group Thumbnails—when selected (default), each group layer’s thumbnail displays a preview of all the group’s contents. When deselected, a folder icon is shown instead.
- Compact Group Rows—when selected (default) and thumbnails are set to medium or large size, group layers will be displayed at the small size.
- Small Thumbnails—when selected (default), displays small thumbnails.
- Medium Thumbnails—when selected, displays medium thumbnails.
- Large Thumbnails—when selected, displays large thumbnails.
- Opacity—Adjusts opacity of the selected items.
- Blend Mode—Changes how the applied pixels interact with existing pixels on the layer below. Choose mode type from a pop-up menu.
 Blend Options—Click to access a dialog for setting the blend ranges, blend gamma and antialiasing settings for the selected layer.
 Lock/Unlock—Click to lock or unlock selected items to prevent accidental selection and transformation.
 Expand/Collapse—Click to expand/contract the item, revealing nested content.
- Item—The created layer, group or object, showing a thumbnail of contents, the item's name and the type of item (in parenthesis).
 Hide/Show item—Uncheck to hide the item; check to make it visible again.
 Edit All Layers—Allows selection and editing of objects across all layers (rather than the current layer).
 Mask Layer—Creates a layer mask to reveal a portion of a layer while the rest of the layer remains hidden.
 Adjustments—Adds an adjustment layer to the current layer for tonal and colour correction.
 Layer Effects—Applies a layer effect to the currently selected layer.
 Add Layer—Creates an empty new layer above the currently selected layer.
 Add Pixel Layer—Creates an empty new pixel layer above the currently selected layer.
 Remove Layer—Deletes the currently selected layer.
Master placement
Upon -clicking a master layer in the Layers panel, you can manage the master layer's source, destination, scaling and anchor position by selecting Properties. This will open the Master Placement dialog.
The following scaling settings can be adjusted from the Master Placement dialog:
- None—places the master at its original size.
- Stretch—stretches the master to fill the page exactly.
- Uniform to Fit—scales the master uniformly to completely fit on the page.
- Uniform to Fill—scales the master uniformly to completely fill the page.