The Fill Tool lets you draw a simple colour gradient across your object. The created fill path can be edited directly on the object to introduce more than two colours along the gradient path, introduce opacity, reposition added colours or control colour transitions. You can also apply a more complex gradient via a Gradient Editor.
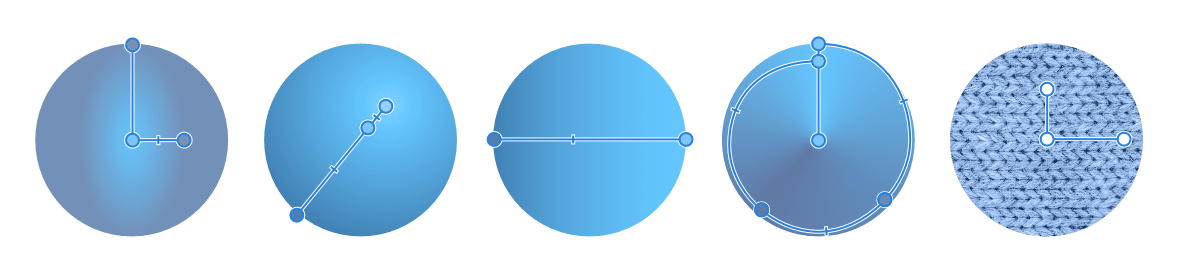
(From left to right) Elliptical, Radial, Linear, Conical, and Bitmap fill types applied to a basic shape. To use the Fill Tool:
Select an object.
Select the Fill Tool from the Tools panel.
From the context toolbar, select either 'Stroke' or 'Fill' from the Context pop-up menu.
From the context toolbar, select a fill type from the Type pop-up menu.
Drag the cursor across the object's stroke or fill depending on what you selected previously.
Hold down the to constrain the angle of the gradient path to 45°.
To create a bitmap fill:
With an object selected, select the Fill Tool from the Tools panel.
From the context toolbar, select Bitmap from the Type pop-up menu.
A file browser window will appear, allowing you to select a file to be used as a bitmap fill. If the image is large enough, it will fill the selected area. A smaller image will be tiled or repeated so that it fills the area.
You can adjust the scaling and rotation of the image by clicking and dragging on the canvas or by dragging one of the axis nodes. Hold down the to constrain the angle to 45°.
Clicking and dragging on the middle node allows you to reposition the image on the object.
To modify a gradient (directly on an object):
With the Fill Tool selected, click an object with a gradient fill applied and then do any of the following:
Click on the gradient path to add a stop.
Click a stop to select it. Selected stops display larger than other stops.
Drag a stop to reposition it along the gradient path. End stops can be repositioned (by dragging) to extend or contract the gradient's length; the angle of the gradient can also be changed by dragging.
Drag a midpoint marker to adjust the spread of colours between two colour stops.
Apply a colour (or opacity or noise value) to a selected stop from the Colour panel.
Delete a selected stop by pressing .
Delete a selected stop by pressing .
To modify a gradient (via the tool's context toolbar):
With the Fill Tool selected, click an object.
From the context toolbar, select the colour swatch.
Click the Gradient option which lets you modify your gradient using the following settings:
Type—determines the gradient type (linear, elliptical, etc.) via a pop-up menu.
Position—controls the position of the stop along the gradient from left (0%) to right (100%), with 50% representing the central point.
Mid Point—adjusts the spread of colours between the selected colour stop and the stop to its right.
Colour—click the colour swatch to display a pop-up panel where you can modify the selected stop's colour (including noise value).
Opacity—controls how see through the stop is. 100% represents fully opaque, 0% represents fully transparent.
Insert—adds a new stop between a selected stop and the stop to its right. The stop adopts the colour at its new position.
Copy—duplicates the selected stop, positioning it between the selected stop and the stop to its right.
Delete—removes the selected stop from the gradient. Deleting an end stop shortens the path back to the adjacent stop.
Reverse—the gradient is reversed, i.e. like a mirror image.