Pressure sensitivity

Affinity Photo 2 offers complete flexibility when using Force Touch enabled devices for real pressure-sensitive drawing and painting. If you prefer a non-Force Touch devices, Affinity Photo 2 offers simulated pressure sensitivity.

Whether you're using Pen, Paint Brush tools, or retouch tools, you can simply connect your Apple Pencil and you've got pressure-sensitive input. If you don't have an Apple Pencil to hand, you can achieve simulated pressure sensitivity just using your finger. The simulated pressure is based on the speed (velocity) of your finger movement.

For mouse users, Affinity Photo 2 lets your mouse become velocity sensitive by default. The same brush tools can be used but with simulated pressure sensitivity based on the speed (velocity) of your mouse movements.

This automatic response is governed by the brush controller which is set to automatic by default—it senses the type of input device and varies brush size, flow, etc. as you paint according to a particular input: 'Pressure', 'Velocity', 'Brush Defaults', or 'None'. If set to 'None', the brush is always a fixed size, flow setting, etc. Otherwise, the brush stroke properties will vary from a minimum to maximum amount (e.g. the full brush width).

While you get the response you need from either input, you'll still be able to fine-tune brush settings for pressure/velocity.

If you want to create a custom pressure profile that can be applied to a previously drawn stroke, you can design it and apply it from the Pen Tool's context toolbar. This can be optionally saved as is, or modified before saving.

To create a pressure profile:
  1. Select the Pen Tool and begin with a stroke.
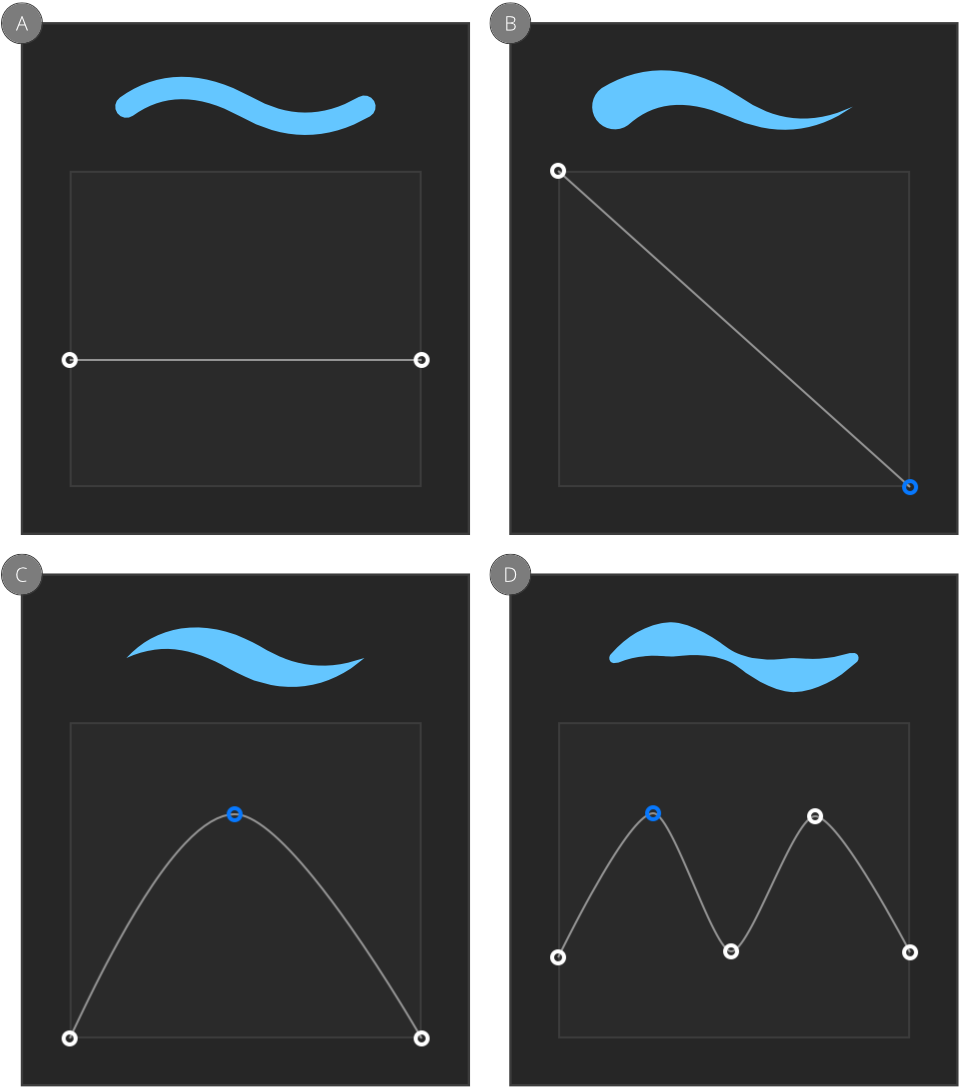
  2. On the context toolbar, tap Stroke and display the Pressure chart using navigation buttons.
  3. Using the displayed chart, do one of the following:
    • Drag either end node downwards to reduce the stroke width uniformly along the stroke length.
    • Drag either end node downwards, then tap halfway along the profile line to add a node which can be dragged upwards to taper the stroke according to the curvature of the graph.
    • Drag either end node downwards, then tap repeatedly along the profile line to add multiple nodes which can be positioned vertically and horizontally to form a variable width stroke.
  4. Begin drawing your pen strokes.
Pressure profile
Uniformly reducing stroke width (A), linear tapering of stroke (B), tapering of stroke at both ends (C) and modulating stroke width (D).
To reset the pressure profile:

Do one of the following:

The profile reverts to its default.

To simulate pressure-sensitive pen strokes:

SEE ALSO: