About blend ranges
Blend ranges allow you to specify how tonal values of a layer blend with the layer(s) below. You can set the range of the tonal values affected and can set the range to have any level of opacity (from opaque to transparent).
The blend range of the selected layer and the underlying layer(s) is controlled in the Blend Options dialog.
You can change the blend range for individual color channels within the dialog.
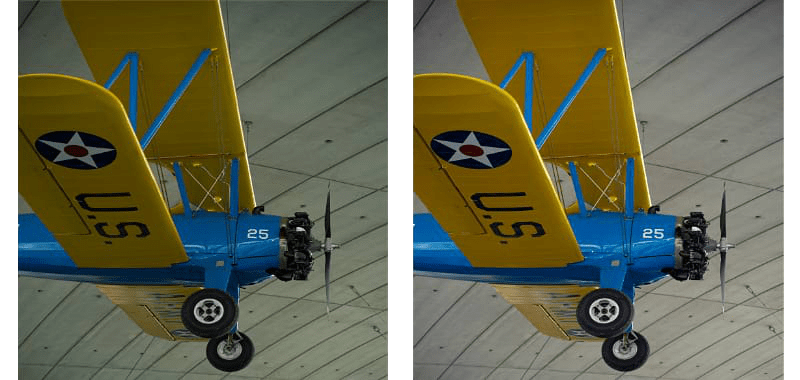
A: Blend Ranges
B: Source: Darks
C: Source: Highlights
D: Underlying: Darks
E: Underlying: Highlights
For the tabbed images above:
- A: Blend Ranges; no blending applied on a gradient fill shape. The image layer resides below the gradient fill shape layer. The latter is selected.
- B: Source: Darks; the darker values of the shape layer blending with the image layer; by pulling the left side of the Source Layer Ranges graph down, the dark tones of the gradient fill shape are being hidden.
- C: Source: Highlights; the lighter values of the shape layer blending with the image layer; by pulling the right side of the Source Layer Ranges graph down, the light tones of the gradient fill shape are being hidden.
- D: Underlying: Darks; the darker values of the image coming through the shape layer; by pulling the left side of the Underlying Composition Ranges graph down, the dark tones of the image layer are showing through.
- E: Underlying: Highlights; the lighter values of the image coming through; by pulling the right side of the Underlying Composition Ranges graph down, the light tones of the image layer are showing through.
About Blend Ranges graphs
The two graphs present on the Blend Ranges are Source Layer Ranges and Underlying Composition Ranges. The first controls how the current layer worked on blends tonally with the layers beneath it, whereas the second determines how the underlying layers blend through the current one.
For each of the two graphs, the dark values are represented on the left, whereas the bright ones are on the right. By modifying the graphs, you're affecting how those tones (including those in the middle) blend.
About Blend Gamma (RGB documents only)
Modifying Gamma offers full power over how the tones of semi-transparent or antialiased edged objects interact with the mid-range of gray tones underneath. Using Gamma via Levels, for example, is a great alternative to controlling the image's overall exposure, high dynamic range and color balance.
Blend Gamma options (on the Blend Ranges dialog) open up even more control over how the midtones are affected by an applied adjustment and how it blends with your image. The dialog also gives you the option of using a linear-RGB color space (1.0), regular sRGB-blending (2.2) or any gamma value up to 3.0, depending on your desired output.
Antialiasing
Antialiasing is the reduction of the appearance of jagged line edges. It is achieved by the addition of semi-transparent pixels along the line to smooth the transition from the line's edge to background objects. This area of transition is sometimes referred to as the antialiasing ramp or antialiasing coverage.
In the dialog, you can adjust the antialiasing ramp (coverage) of the selected layer, as well as control how (and if) antialiasing is inherited or set independently of other layers. For improved workflow, child layers nested hierarchically in a parent layer can inherent the parent layer's antialiasing setting automatically but can be forced to apply antialiasing or ignore it.
