The Gradient Tool does a great job in drawing a simple colour gradient across layers (pixel layers, fill layers, adjustment layers, live filter layers, layer masks) as well as vector and text content. However, you might want to apply a more complex fill, introducing more than two colours along the gradient path, adjust where each colour is positioned and/or control colour transitions. You can do this in two ways:
Directly on the Gradient tool path.
Via the tool's context toolbar.
Using the former, you modify the gradient by eye; the latter lets you design with precision and absolute control.
If you apply a gradient directly to your image's layer you'll destroy the layer content. Instead, apply gradients to a separate pixel, fill, adjustment, filter, mask or vector layer. With Fill layers, your gradient path will additionally remain editable.
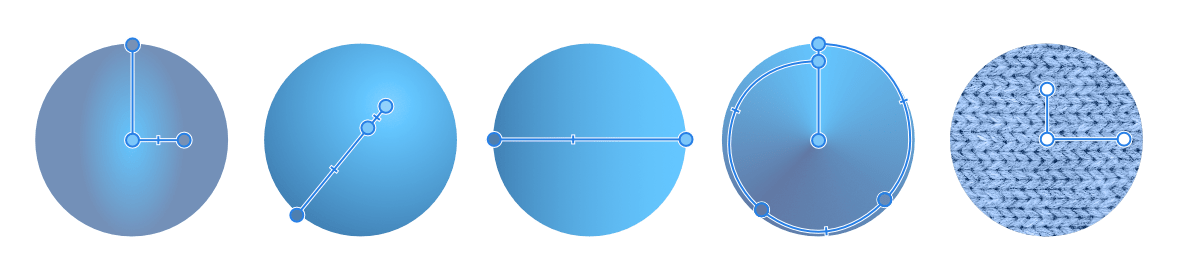
(From left to right) Elliptical, Radial, Linear, Conical, and Bitmap fill types applied to a basic shape. To apply a gradient:
Select layer content.
Select the Gradient Tool from the Tools panel.
From the context toolbar, select either 'Stroke' or 'Fill' from the Context pop-up menu.
From the context toolbar, select a fill type from the Type pop-up menu.
Drag the cursor across the object's stroke or fill depending on what you selected previously.
To create a bitmap fill:
Use the Move Tool to select an object.
Select the Gradient Tool.
Do one of the following:
From your Finder window, drag the file of choice and drop it onto either the Swatches panel, Colour panel or the Foreground/Background colour selector.
From your Explorer window, drag the file of choice and drop it onto either the Swatches panel, Colour panel or the Foreground/Background colour selector.
From the Assets panel, click an asset, e.g. a texture, shape or other.
From the Stock panel, click one of the photos from your search results.
Use the context toolbar settings and the tool's nodes to modify the fill as required.
To modify a bitmap fill:
With the Gradient Tool active, make a selection.
On the context toolbar, click Rotate gradient to change the orientation of the fill at 90° clockwise intervals.
Enable Maintain aspect ratio to ensure the bitmap fill is not stretched or squashed when edited.
Set the Extend and Quality options as desired. The former option controls how the tile that makes up the bitmap is presented; the latter how the bitmap fill is resampled on object resize.
Check Scale with object to allow for stretching or shrinking of the bitmap fill while resizing. Leave it unchecked to ensure stretching or shrinking isn't taking place thus preserving the texture of the image.
To modify a gradient (directly on a layer):
With the Gradient Tool selected, click the content with a gradient fill applied and then do any of the following:
Click on the gradient path to add a stop.
Click a stop to select it. Selected stops display larger than other stops.
Drag a stop to reposition it along the gradient path. End stops can be repositioned (by dragging) to extend or contract the gradient's length; the angle of the gradient can also be changed by dragging.
Drag a midpoint marker to adjust the spread of colours between two colour stops.
Apply a colour (or opacity or noise value) to a selected stop from the Colour panel.
Delete a selected stop by pressing .
To modify a gradient (via the tool's context toolbar):
With the Gradient Tool selected, click the layer content.
Deselect any selected stops.
From the context toolbar, select the colour swatch.
Click the Gradient option which lets you modify your gradient using the following settings:
Type—determines the gradient type (linear, elliptical, etc.) via a pop-up menu.
Position—controls the position of the stop along the gradient from left (0%) to right (100%), with 50% representing the central point.
Mid Point—adjusts the spread of colours between the selected colour stop and the stop to its right.
Colour—click the colour swatch to display a pop-up panel where you can modify the selected stop's colour (including noise value).
Opacity—controls how see-through the stop is. 100% represents fully opaque, 0% represents fully transparent.
Insert—adds a new stop between a selected stop and the stop to its right. The stop adopts the colour at its new position.
Copy—duplicates the selected stop, positioning it between the selected stop and the stop to its right.
Delete—removes the selected stop from the gradient.
Reverse—the gradient is reversed, i.e. like a mirror image.
Scaling
Scaling bitmap fills
It is possible to rescale a bitmap fill by either restricting or allowing for the bitmap fill to grow or shrink when transforming, depending on the desired effect. One benefit here is that it is possible to leave the bitmap image and its texture unaffected by shrinking or stretching.
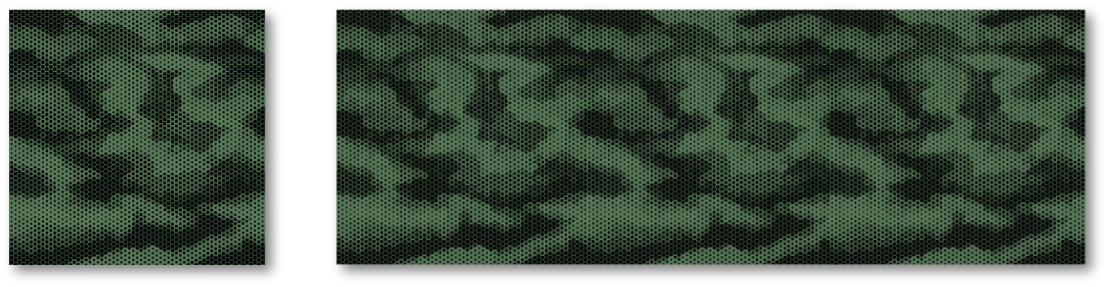
A bitmap fill's texture unaffected by stretching a square object.
Transforming objects with linear or radial gradient fills
When you scale or shear an object with a linear, radial or conical gradient applied, the gradient will automatically reapply itself to fit the modified object's new shape. For shearing, dashed correction paths are applied to the gradient to indicate the gradient transformation.
The paths can be edited to control the shear and scale on the fill if needed—the path and stop can also be removed to ignore the gradient transform if needed.
Unsheared and sheared rectangle (the latter shown with and without correction paths)
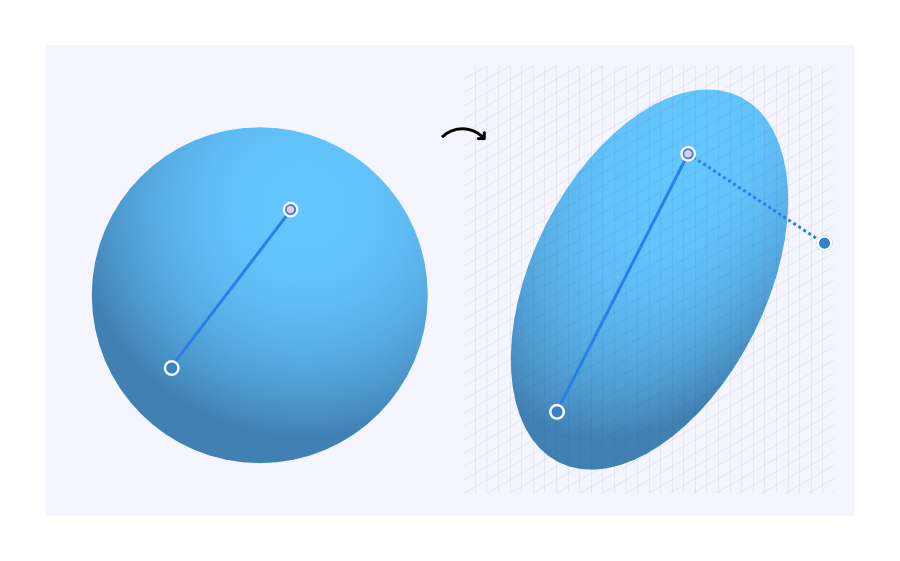
This is also important when transforming two-dimensional objects onto an isometric grid plane as the gradient also needs to be intelligently transformed onto the plane, along with the shape's outline. On the transformed object, a dashed correction path is automatically applied as before.
Circle with radial fill transformed onto an isometric plane (Front Plane), showing a single correction path.To convert the transformed fill to a conventional gradient fill:
Double-click the correction end stop to remove the correction path.