Painting brush strokes

Use the Paint Brush Tool to apply brush strokes to your design.

Pixel painting example

Painting

The Paint Brush Tool and other brush-based tools can be used to add brush strokes to your image for creative or corrective reasons. An impressive selection of categorized brushes is available for use with these tools in the Brushes panel. Each category in the panel contains brushes of varying properties and characteristics.

The appearance of brush strokes are determined by a combination of the chosen brush tool, the Brushes panel and the tool's context toolbar.

Multi-brushes

This feature allows any brush to have one or more additional sub brushes attached to it. The sub brushes will draw over the top of the base brush as the stroke is applied. It is intended to introduce more nib variety, randomness and character to your brush stroke appearance (avoiding repetitive texture tiling) so the results are more varied and natural. Each sub brush can have a fully separate and customizable set of dynamics. You can control where the sub brushes are drawn on the stroke and how they blend with the main brush.

Sub-brushes can be created from an existing brush or as a new brush by accessing the Sub-brushes tab in the Brush - Editing dialog (double-click a pixel brush in the panel to view). You can drag and drop existing brushes from the same Brushes panel category directly into the tab's Sub Brushes list. Change the order in which they are added to the main brush by dragging them up or down in the list.
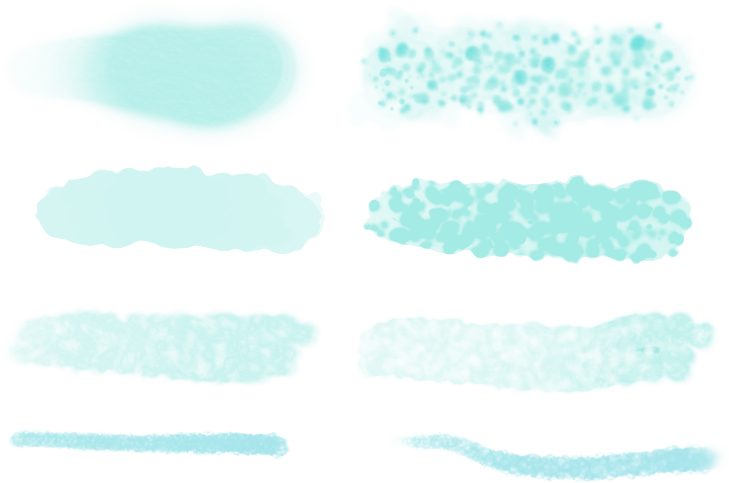
Sub brush examples

Single brush strokes (left) and multi-brush stroke equivalents (right).

Mirror painting

Using the Symmetry and Mirror options found on the context toolbar, you can create variable repeating patterns with radial or Mandala-style symmetry over one, or multiple planes.

Mirror painting example

Applying mirrored brush strokes to create a pattern.
Paint Brush Tool To paint brush strokes:
  1. Use the Layers panel to select the layer that you want to work on, or create a new layer.
  2. From the Tools panel, select the Paint Brush Tool or other brush-based tool. (See tip below.)
  3. From the Brushes panel, select a brush thumbnail of your choice. (See tip below.)
  4. Adjust the context toolbar settings.
  5. Lock the symmetry line to prevent it from moving accidentally.
  6. Select a stroke color from the Color panel.
  7. Drag on the page in the direction that you want the brush stroke to follow.
To smooth brush strokes as you paint:
Undo Brush Tool To undo painted modifications:
  1. From the Tools panel, select the Undo Brush Tool.
  2. Paint over pixels which you want to return to their original value.
Erase Brush Tool To erase brush strokes after you paint:
  1. From the Tools panel, select the Erase Brush Tool.
  2. Paint over areas of your brush stroke.
To create symmetrical and mirrored effects:
  1. Enabling the Symmetry option from the context toolbar allows you to produce symmetrical or mirrored drawings over one or multiple planes.
  2. You can rotate the symmetry plane from the center of the drawing by clicking and dragging on it. Selecting will make it snap to different angles.
  3. Click the Lock setting to lock the symmetry plane in place.
  4. Use the live brush preview to see the direction of the symmetrical brush strokes. If the direction needs to be mirrored, check the Mirror option on the context toolbar.
  5. If you wish to work with more than one plane of symmetry, click the numerical value box next to Symmetry and adjust the number of planes. You can use up to 16 planes in total.
  6. With the Lock setting unchecked, you can reposition the center point of the symmetrical planes and draw symmetrical and mirrored patterns elsewhere on the page.

Symmetrical dreamcatcher

A dreamcatcher design with a symmetrical pattern.

Mirrored dreamcatcher

A dreamcatcher design with a mirrored pattern.
To use opacity quick keys:
  1. Select a brush tool.
  2. Press a numerical key, or two numerical keys in quick succession, to set the opacity. For example:
    • Press 4 for 40% opacity.
    • Press 0 for 100% opacity.
    • Press 4 and 5 for 45% opacity.
    • Press 0 and 7 for 7% opacity.

SEE ALSO: