Placing content allows you to add images and Affinity (Designer, Photo, etc.), Photoshop, Illustrator, Freehand and PDF documents to your current document.
Content placed in this way can be replaced using the options on the context toolbar.
About placing content
Once you've opened your image/document, you can place additional content.
Some useful tips when placing content include:
For images, the placed image is added as an image layer rather than a pixel layer. This allows the original image data (e.g., the native resolution, color space and color profile) to be kept. On export to PDF, this data is re-embedded into the PDF file.
Use the context toolbar's scaling controls to ensure correct sizing of CAD-derived PDFs or PDF/PSD adverts on placement.
Placed documents offer a Page Box option on the context toolbar to choose how the page displays (e.g., with/without bleed, objects only).
The added content can be rasterized at any time via the Layer menu (or via right-click).
The file's embedded color profile will always be converted to the document's current working space.
For unprofiled placed images, the color space is assumed to be RGB.
Some brush operations will automatically rasterize image layers to the document resolution.
For further information on placing specific file types, please refer to the following table:
Content type
Comments
Affinity Designer files with multiple artboards
You'll be provided with an Artboard option on the document's context toolbar so you can choose which artboard is displayed.
Affinity documents, PDFs, SVGs and PSD files
The file will be listed in the Layers panel as either an Embedded document or Linked document depending on the Image Placement Policy set during initial Document Setup.
PDFs, SVGs, PSD and EPS files
If these are placed as embedded documents, you can edit them within Affinity. If edits are made, these files will be converted to Affinity documents and the original data will not be retained; you will not be able to write the embedded file out to its native file format and make it linked. Other features such as using PDF Passthrough will also then be lost. Please note that the Resource Manager will always display the original file's source filename and location should you need to refer back to it.
Affinity documents, PDFs, SVGs, PSD and EPS files
If these are placed as linked documents, you will not be able to edit them directly within Affinity. However, any edits made to the files will be picked up by Affinity and will be reported as Modified in the Resource Manager. You can then use the Resource Manager's Update button to update the files to match the external changes that were made.
Multi-page Affinity documents or PDFs
You can choose which page or spread you want to display by using Spread on the context toolbar. For PDF, only one page can ever be displayed, although you can simulate a spread by duplicating the placed object and choosing a different page to view.
Placed PDFs
These offer a PDF Passthrough option on the context toolbar, which defaults to Passthrough for exact reproduction within your own PDFs. If that's not possible, the Interpret option is selected. A bitmap preview of the PDF’s contents is displayed while editing your document in Affinity Designer.
Password-protected PDFs
Placing a password-protected PDF will prompt you to enter the file's password. The password is then requested whenever you open the parent document. When the parent document is exported, the resulting PDF does not have to be password-protected. If you wish to protect the exported PDF, ensure you set the required password(s) and restrictions on Affinity's Export dialog.
Placed PDF, DWG or DXF files containing layers
These offer a Layers option on the context toolbar, from which you can choose which of the placed file's layers are visible or hidden in your Affinity document. For example, a layer of a DWG or DXF file might contain notes or more technical information, such as component labeling, that you want to omit for a less technical audience. For PDFs, changing layer visibility will automatically set PDF Passthrough to Interpret.
Once added to your page, you have the option to replace the content, retaining its position, as well as edit placed content.
Placing images from the web
Images can be placed by dragging and dropping them from a web browser, either as an embedded or a remote resource.
When an image is placed as a remote resource, its source address (URL) is recorded in your document. Affinity detects when a remote resource has been modified and will either notify you or automatically update the resource, according to the auto-update behavior setting in the app's General settings.
A document's remote resources can be embedded at any time, e.g. when you are ready to send it to a professional printing service or want to create an archive of a publication. The document will retain its record of a resource's source address, which enables it to be made remote again if needed.
Any image from the Web that is initially placed as an embedded resource does not have its source address recorded and so requires you to perform the same steps again if it needs to be updated.
To place content:
Do one of the following:
Select the Place Tool.
From the File menu, select Place.
In the pop-up dialog, navigate to and select a file, and click Open.
Do one of the following:
Click to place the file at its default, displayed size.
Drag on the page to set the size and position of the content.
Alternatively, you can drag and drop the file onto the page to place it. The current image placement policy (embedded or linked) will be honored.
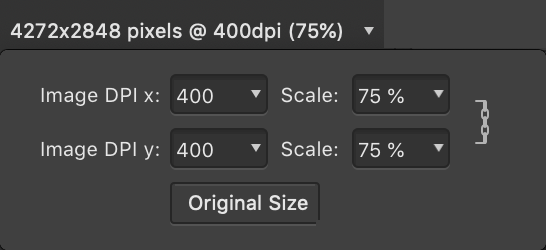
To scale a placed image/document by DPI, percentage scale or to original size:
Select the image or document.
From the context toolbar, select the Image/document Info section and choose an Image DPI or Scale percentage value from the pop-up menu. Alternatively, click Original Size to scale to 100% (native dimensions) and reset aspect ratio.
To return squashed content to its original aspect ratio:
With the content selected, double-click on one of its edge handles to reset its aspect ratio.
To place multiple files:
Do one of the following:
Select the Place Tool.
From the File menu, select Place.
In the pop-up dialog, -select the files you wish to place, and click Open.
The Place panel will appear, displaying the files you selected for placement. The files can be placed consecutively from here each time you click on the page or picture frames you would like to place them in until the panel no longer holds any files, starting with the topmost file in the panel. Alternatively, you can click on a file within the panel and then click on the page or picture frame to place that specific file.
To edit an embedded document:
Do one of the following:
Double-click the placed document.
From the context toolbar, select Edit Document.
To add an image to a layer (via Finder):
Drag an image from Finder to your page. The image will be added to the project as a new layer.
To add an image to a layer (via Explorer):
Drag an image from Explorer to your page. The image will be added to the project as a new layer.
To add an image from a web browser to a layer:
Drag an image from a web page.
Do one of the following:
To make the image an embedded resource, regardless of your document's image placement policy, drop the image onto your document.
To make the image a remote resource, hold the and drop the image onto your document.
To replace content:
Select placed content.
From the context toolbar, select Replace Image or Replace Document depending on what you've placed.
Select a replacement file from the file browser window.
(Optional) You can choose whether to embed or link the replacement file by clicking Options on the file browser window. The placement option you select will override the placement policy for the document in this instance.